This is one of the common issues that Windows users face. A high CPU usage leads to many issues and an awful computing experience. But not to worry, as the error can be easily fixed. There are a bunch of different methods that you can try out. In this article, I am going to talk about such methods only. So let’s get into the topic right away: Also, Read: How to Fix Runtime Broker High Usage on Windows 10
What is Windows Modules Installer Worker?
Windows Modules Installer Worker or TiWorker.exe is a module designed to check for Windows updates and install them on your computer. Whenever this program is running in the background, it means that the program is searching for a Windows update or installing an update. The process should end automatically after a while.
How to Fix Windows Modules Installer Worker — High CPU Usage
Windows Modules Installer should stop running after a while. However, if something goes wrong, then it can cause a high CPU usage error. You probably have already tried restarting your computer, but that didn’t work for you. Instead, to get rid of the error, you should try the following fixes:
1. Stop and disable the Windows Update service
As mentioned earlier, the issue is mainly caused because the program is looking for Windows updates or installing them. Hence, the best way to fix the issue is to stop and disable the Windows update service. By doing so, Windows will no longer be able to look for any updates or install any updates. To do so, you have to follow the below steps:
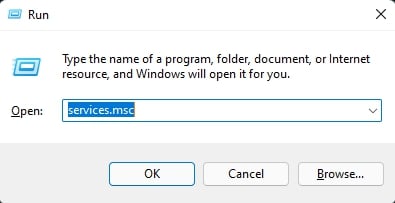
First, from your keyboard, press Windows Key + R to launch the Run box.Type down, services.msc and press enter.
This will launch Services Window. From here, look for the Windows Update option.
Double-click on Windows update.Then set its startup type to Disabled and then click on the Stop button.Click on Apply -> OK and reboot your computer.
That’s it. It should fix the high CPU usage error on your computer. If it didn’t, then move to the below fixes.
2. Remove the SoftwareDistribution folder
The next method that you can do is delete the SoftwareDistribution folder. The folder is used by default to store new updates on your Windows machine. However, if this folder is corrupted, it can lead to a bunch of issues, and Windows Modules Installer Worker is one of them. Luckily, deleting the folder will not put your PC at any risk. Also, Windows will automatically create a new folder with the same name when a new update is found. To delete the folder, you have to follow the below steps:
First, disable the Windows Update service by following the first method.Go to File Explorer and navigate to the C:\Windows path.Over here, look for the SoftwareDistribution folder and right-click on it.
Select, Delete.
Then reboot your computer, and it should fix the issue for you.
3. Restart Windows Update Service
A simple restart can often fix the issue. All you have to do is restart the Windows update service (from the first method) and see if it works. To restart the service, you have to press Windows Key + R to bring the Run box. Then type down services.msc and press Enter. Look for Windows Update and right-click on it. Finally, hit the restart option and check if you are still getting the same error.
4. Use Windows Update Troubleshooter
You can also try running the Windows update troubleshooter to diagnose the problem. I know that troubleshooting doesn’t work in most cases. But there is no harm in trying it out. Also, maybe it will tell you what is causing the issue, so you can look for further solutions. You can access the troubleshooter by going to Control Panel > Troubleshooting > Select View All from left panel > Windows Update. After that, click on next, and Windows Update Troubleshooter will start looking for issues and try to fix them.
5. Use System File Checker Tool To Scan And Fix Corrupted System Files
In case if any of the system files are corrupted, then it can also lead to high CPU usage errors. To fix that, you can simply run the System File Checker tool to scan and repair corrupted files. To get started, you have to follow the below steps:
Press Windows Key + X and select Windows Terminal (Admin).In Windows terminal, run the following command and press enter: sfc/scannow
That’s it. Now the System File Checker tool will start searching for corrupted or missing system files on your Windows computer. Also, it will try to repair or replace the files if possible.
Once the process gets completed, reboot your computer. Then check if it did fix the issue for you.
6. Use DISM Tool
You can also give a try to the DISM tool. The tool is used for scanning Windows OS for corrupted files and fixing issues automatically. You should try this tool when SFC fails to repair corrupted files. To get started, follow the below steps:
First press Windows + X, then select the “Windows Terminal (Admin)” option.Now in the Windows Terminal, type the following command and press enter: dism.exe /Online /Cleanup-Image /RestoreHealth or DISM /Online /Cleanup-Image /RestoreHealth
Now, wait for the DISM tool to scan your computer and repair corrupted files.
Finally, restart your computer and check if you are still getting high CPU usage errors or not.
Conclusion:
So that was all for your question about how to Fix Windows Modules Installer Worker — High CPU Usage error. Now it is your turn to try the above fixes out and see if they are any help to you. Also, if you want to ask anything else, then do drop a comment below. Also, Read: How to Fix Your Windows License Will Expire Soon Error in Windows 10


